
The following tutorial is brought to you by Nicole from The Madlab Post...

It’s time for Letter Play - Where DIY activities, cinema and life offline collide!
Sometime in the last two weeks or so, I came across an adorable handmade birthday card that was inspired by Twitter. The popular social networking website was to become the topic of today’s post but my Twitter craft ideas were too complex to finish in a short amount of time as my schedule and goals continue to get the best of me. Since, my friend David gave me some photos to use in a YouTube/Television series that I’m currently working on, I decided to kill two birds with one stone and construct a DIY picture frame - a handmade item that could be done quickly with just a few household arts and crafts items.
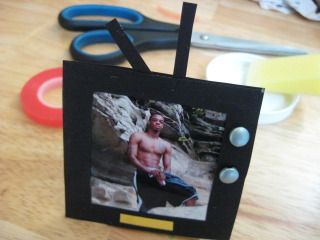
Here are instructions on how to make a TV picture frame for your home, office cubicle, school locker, car dashboard, bookshelf or any other place where you want to display new photos.
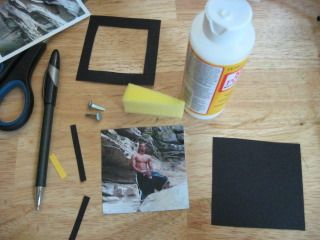
Materials used for this TV picture frame:
- Two Black 3x3 inch cardstock squares - One solid and one open square, cut into a sizeable border.
- One 3x3 inch photo
- Two thin strips of black cardstock (to be used as antennas)
- One small strip of yellow cardstock (to be used as a VCR/DVD player)
- Glue
- One pen
- Scissors
- Two brads
- One sponge or paint brush
- One small piece of cardboard from the top of an aluminum foil box* or similar item. (*Optional)
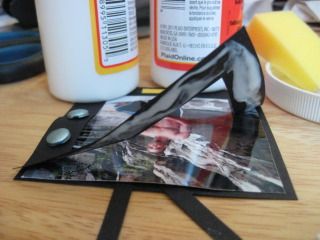
Step 1. Glue the black “antenna” strips in the middle of your solid black square.
Step 2. Attach the photo to the solid square, on top of the antenna strips, using glue. Set aside to dry.
Step 3. Glue the yellow “DVD player” strip onto the bottom center of your open square.
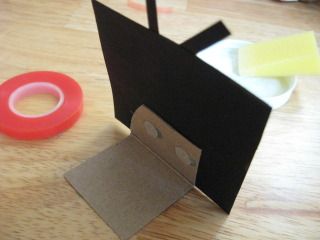
Step 4. Poke holes into the upper right side of your open square, using a pen.
Step 5. Put one brad through each hole on the open square and then fasten them on the opposite side.
Step 6. Glue the open square on top of the solid photo base, press down and allow to dry.
Step 7. Fold a small piece of cardboard and then attach half of it to the back of your finished TV photo frame, using double-sided tape. As an alternative, you can also use magnetic squares or strips if you want to display the photo on a refrigerator or other magnetic surface.
Additional options for using this DIY handmade photo frame as a stand-alone item include placing it on top of your dresser, window base, mantel or coffee table. Enjoy!
------------------------------------------------------------------------------------------------------------
Do you like group blogging activities? Sign up for the Monday Movie Meme, a weekly blog series that inspires discussion about entertainment, in a whole new light and provides recommendations for your DVD, on-demand or theater fix. New topics are posted every Monday!
NICOLE
Blog: The Madlab Post
Also @MadlabPost on Twitter
Nice! If I get some spare time at the office I might give this one a go.
ReplyDeleteThat's pretty cool, although uncrafty guy that I am, instead of making a nifty picture frame like you did, I'd probably just make a big mess. I know there are some talented folks out there who could do this rather nicely.
ReplyDeleteGood project demo, Nicole.
Lee
Tossing It Out
Jamie Gibbs,
ReplyDeleteThat's what lunch breaks are for ;) When you finish it, be sure to send me a pic or post it on your blog or something...maybe Instagram it and let me know on Twitter.
JoJo,
Thanks, I love that you love it. Had I known about this Saturday beforehand, I probably would have made a nice frame for Vince's big day! (You know what I'm talking about)
Arlee,
I'll likely make a video version of this, so you can follow the steps that way...or offer the project to someone in your family during a get-together. Thank you for checking this out and I'm happy to know you give it good ratings.
~Nicole
Blog: The Madlab Post
@MadlabPost on Twitter
Wow, how awesome is that! Always wanted to see myself on 'TV'. Gosh :)
ReplyDeleteA great post and so interesting.
ReplyDeleteYvonne.
i love this--adorable!
ReplyDeleteI love your craft ideas. Especially making the VCR. At least my boys (15 and 12) know what one is. I remember when my boyfriend was the first of anyone I knew to get one (in 1983) and we watched a movie at his house. It was groundbreaking! Um, yeah. Now I'm watching YouTube on my iPhone...
ReplyDeleteTina @ Life is Good
Post A-Z Road trip!
klahanie,
ReplyDeleteGetting on TV is easy...just start a reality show called "Real Husbands of ______" ! LOL
Yvonne,
Thank you for reading and finding it to be of interest.
Lynn,
You're too kind...thanks much! I appreciate you taking the time to read it.
Tina,
Thanks! Tell me about it...times are a-changing. I saw a news headline somewhere recently about teenagers asking "Who's Rodney King?" on Twitter, when he died last month. That goes to show how some things are not on their radar.
I worked in retail a few years ago and my store manager told me that her nephew didn't recognize a VHS tape that he saw when she was cleaning her apartment. All I could think was "WOW!" and on the flipside....the older generation doesn't even know what an iPhone is, let alone how to use one. I tried to explain how an iPod Touch works and how Twitter works to my grandmother and she was like "What? That is a bunch of mess!" LOL